I never got around to show what I did to the 6200 i had for a while, but maybe I will show that some other day.
Anyhow, I got myself an 8400 last summer, and since then I've done several tweaks and mods to it.
First of all, the factory cooling sucked, so the first mod I did was to swap the radiator from the old 6200 with the 8400 one.
The problem now was that the 6200 radiator did'nt have a fan, and I was all out of superglue.
I had an old fan which once upon a time was used to cool an pentium CPU.
I dug around in my "loose screws" box, and finaly dug up one screw that fit rather ok'ish, and another screw that just did'nt fit at all.
I managed to fasten the fan by simply screwing it ontop of the radiator, using the spaces in the radiator to hold the screws.
However, that did'nt quite work out, since the screw was poking out and made me unable to mount the card in the PC.
After some tweaking of the placement of the screws I finaly managed to fit it, although the fan had to be mounted sort of sideways.
It's ugly as hell, but it works, which is good enough for me.
One thing I might mention here, is that normaly, fans are mounted so that they blow air onto the radiator, While modding other cards, I've found that mounting the fan to suck air from the radiator works better.
The next thing I did was to add a "box" around the card.
If you look at new cards, they pretty much all got boxes,which sucks air through a hole and blows it out of the computer.
My version works pretty much the same way, except it sucks air from the outside of the PC and blows it out through the hole.
This is much better, since the GPU will be chilled using fresh air from the outside, rather than using second hand, already warm, air from inside the PC case.
Another thing about this design is that the underpressure in the case, helps to suck air in aswell.
the old 6200 had a similar box, but no fan, all the airflow was sucked in by the casefan and the PSU fan, which greatly increased cooling, without adding an GPU fan.
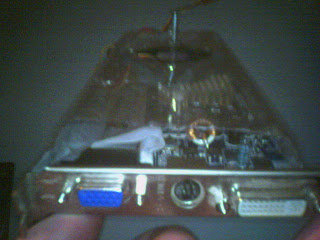
Anyhow, the "box" I added, was made from an old box of ,, I think it was an energylamp or something like that, which was roughly the same size as the card.
After some cutting and ducttaping, this is what I ended up with.


As you can see, it's ugly as hell, which a huge screw sticking out.
The "box" is shaped so that I have a gap which is aproximately the size of the cardslot in the case, which I left open to left air in.
There is a hole for the fan to pass air out, and the whole thing is just held in place with duct tape.
Ugly, but it works.
When I got this card, It had a radiator made from cardboard with a tiny fan, all held in place with some grey chewing gum as cooling paste, and 2 tiny plastic things.
Well , atleast that's what it seemed like, because the cooling it did was horrible.
65°C at Idle!! , and over 80°C at load.
After My mods, it went down to around 45°C at idle. and 65°C at load.
Time to Overclock this thing!
I'm using Rivatuner to overclock this thing.
The GPU clock increases in 27mhz increments, so I've tried to overclock in 27mhz increments.
The default clockings for this card are..
Core clock = 459Mhz
Shader clock = 918Mhz
Memory clock = 400Mhz
For testing the preformance, and more importantly the temperatures of the card, I'm using Furmark, which is an OpenGL benchmark that will Realy make your card run hot. I have'nt seen anything else that can make the card run hotter.
The Furmark score for running the card at default settings is 850 http://www.ozone3d.net/benchmarks/score.php?id=f2660010dd7880b9ddc05b13f03a75bf
I've managed to clock the card to ..
Core clock = 675Mhz
Shader clock = 1380Mhz (or 1404Mhz)
Memory clock = 486Mhz
I'm unsure about the shaderclock, because the Rivatuner only goes up to 1380, that reports the shader clock speed as being clocked 1404Mhz, however GPUZ reports 1380. I'm guessing the real speed is realy 1404Mhz because of clocking intervals, but I can't confirm this.
This gives me an Furmark score of 1241 http://www.ozone3d.net/benchmarks/score.php?id=f2660010dd7880b9ddc05b13f03a75bf
here are the GpuZ details http://www.techpowerup.com/gpuz/dy53a/
The Temperatures of the card is 51°C in Idle , and 72°C at full load with Furmark for 15mins.
Which is quite acceptable considering that after gaming for hours, the GPU temp is usualy around 67°C.
Furmark is realy good at testing how hot a card will get.
This is the fastest, stable configuration I have managed to get, and I'm using it all the time for gaming and stuff.
Rivatuner lets me clock the Core clock up to 690Mhz, which gives the nearest interval at 702Mhz. However this gives some tiny artifacts while running Furmark, so I'm sticking to 675Mhz.
The memory can be increased in smaller intervalls, but will create havok with the apps over 500Mhz. (freezing, flickering and so on.), so i'm sticking to the 27Mhz interval of 486Mhz.
The speed of the video ram mostly affects how fast it can load textures and stuff, so its mostly affecting Loading times, with very little effect in benchmarks.
All in all , it's not bad for a card I spent about 33€ on =)
Game on
