The build continues.
So I finaly got around to finish my watercooling build the way I intended it from the start.
Watercooling blocks for Graphics cards are not cheap.
So I figured I'd have a go at making my own block.
One good thing about this card is that it already have a good solid copper base.
Dismantling it reveals a big copper base, plastic fan, and a piece of aluminum to top it off.
The Card is a XFX Geforce 9600 GSO with 768MB ram.
The GSO line is more like an in-between of 9600 and 9800. (And there are ways of modding the BIOS so it turns into a 8800 GT 512MB)
Anyhow here's a picture or it never happened of the card in pieces.

So the First thing I had to do was make a way for water to flow over the copper base.
What I'm using here is a copper pipe 6mm (atleast I think its 6mm)
The copper pipe is tricky to bend, even with a tool, because the tool makes large bends, and I had to shape it smaller by hand. Something that can easily ruin the pipe, because if you bend the pipe too hard it will just fold.
This is what I finaly ended up with.

I was a bit worried that the hose connectors would be difficult to solder onto the pipe.
But it turned out to work just fine.

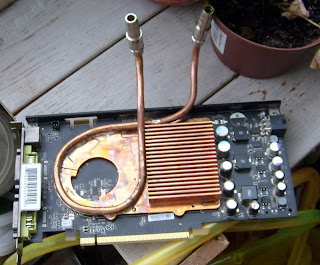
Next up was to solder the pipe onto the copper base.


Next up was to solder the pipe onto the copper base.
It takes quite alot of heat to warm up the whole thing to the point where you can solder it. I used a small blowtorch, I'm not sure if a soldering iron might be enough on this much copper.
Here it is after that's all done and mounted back onto the card.
Next up is to dismantle the whole watercooling system and rebuild it with a few additions.
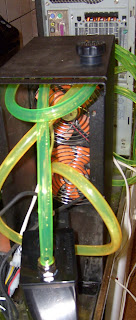
Here is a picture of the pump and water tank standing ontop of the Heart case.
The Heart case used to be an old printer server which I got from a friend, I've been saving it for a project like this. and you can also see the bigger radiator at the bottom of the picture.
I have the old fluid in the bottle there, and used that to top up the new liquid I bought.

oh yeah,, I should mention here that in order to ensure airflow in the Heart case, I unscrewed one of the 120mm fans and turned it around, so it will create an in-out flow in the case, as the Heart case does'nt have any air holes.

And here is the insides with the card mounted.
It turned out to be very very tight at the bottom with the hoses from the card.
Note to self, Next time, remember to angle the hoseconnectors sideways.


Notice the difference in color of the hoses, the realy green ones are new, and the yellowish one is a piece of the old hose. well , I say old, but it's only about 2 months old.
I have no idea what made it go Yellow, and it only affected the hoses on the outside of the case. the hoses inside of the case was still green. I got a UV LED inside the case, so it's probably not because of UV. Odd.

And Finaly after assembling the whole thing, Making a 2 powercable to power the fans and pump, and rebuilding the whole cooling system, here is the finished result.
Front and back pictures

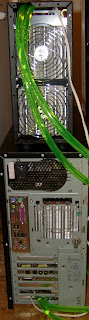
I have to say that the Heart looks great. and looking at it like this I can realy see how ugly the PC case is.

I have to say that the Heart looks great. and looking at it like this I can realy see how ugly the PC case is.
It was alot of work , but in the end it was worth it.
And it works just Great!
I was worried that the copper pipe did'nt have enough coverage area on the copper block , but turns out to work just great. After running the system at MAX ,, with 100%CPU and Furmark to max out the card, The peak temp of the card was only 56C with the CPU at 54C. Not bad considering that the same water is used to cool both.
Before the build the graphics card easily hit peaks of over 76C, So a 20C difference is not bad at all for a first try DIY waterblock =) . And the Heart case looks great.

No comments:
Post a Comment